Spoke Tension Measurement and Adjustment
A properly-tensioned wheel is stronger, and stays true longer. This article will review how to properly measure and adjust spoke tension.
Getting Started
- Spoke tensiometer such as the TM-1 Tension Meter
- Appropriate spoke wrench (see Spoke Wrench Selection)
- Truing stand or wheel holder (optional)
Spoke tension is the amount of pulling force being exerted along a spoke. It is typically measured and called out by component companies in Kilograms of force (kgf), or in Newtons (N).
When truing or dishing a wheel, the mechanic is making adjustments that affect spoke tension. However, spoke tension isn’t just about individual spokes. Rather, good tension looks at the entire wheel system with the goal being consistently good tension between all the spokes.
When a bike is being ridden, the wheel flattens slightly where it meets the ground. As this happens, the tension of the spokes at the bottom of the rim drops. This cycle of gaining and losing tension happens throughout the entirety of each ride. If a wheel’s tension is too low, it can cause the spokes to relax too much during a ride, creating a snapping effect and causing excess stress to both the spokes and the rim. This can lead to de-tensioning, which is when spokes lose tension over a short amount of time. This can lead to broken spokes, rim fatigue and a wheel that will go out of true more often. At the other extreme, too high of tension can lead to wheel failures like cracked rims, broken spokes or even damaged hubs.
Tension Measurement
Before measuring spoke tension, it’s a good idea to determine what ideal tension should be. Consulting with your rim’s manufacturer is a great place to start. Most rims have suggested ranges from 100 to 120 Kilograms-force, or 980 to 1177 Newtons. This is assuming there is no pressure in the tire.
One method of estimating spoke tension is to simply squeeze the spokes. In time, you will become versed in estimating acceptable tension. To do this, squeeze spokes in pairs and compare to a wheel you know to have good tension. Though not foolproof, squeezing spokes from a wheel you know to have good tension is a way to get a sense of what is acceptable tension
Though not super precise, squeezing is still a more accurate technique for judging spoke tension than feeling the amount of effort it takes to turn a spoke nipple. Like any fastener, the nipple will tend to get more difficult to turn as tension increases – however, just because the wrench is difficult to turn doesn’t mean the spoke tension is too high. This could also be caused by corrosion or by the spoke being at the end of its threads.
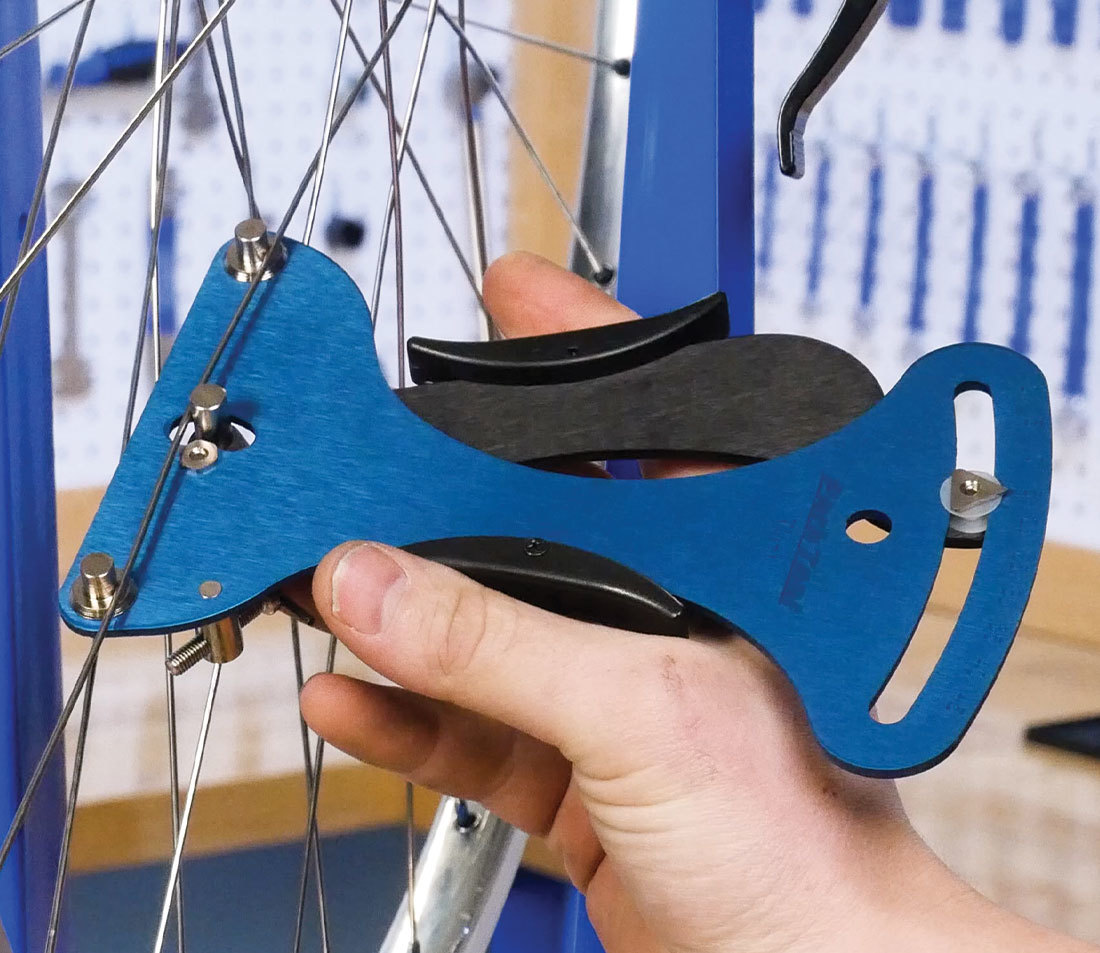
The most accurate and precise way to measure spoke tension is with a spoke tensiometer like the Park Tool TM-1. Spoke tensiometers flex a spoke between two posts with a calibrated spring. This deflection is shown on the meter’s scale.
- Determine the material of the spoke. Steel spokes will have a magnetic pull - test with a magnet.
- Determine the diameter (for round spokes) or dimensions (for bladed spokes) of the spoke. Measure in the middle of the spoke using a caliper or the spoke diameter gauge included with the TM-1.
- Squeeze the TM-1 at the handle grips. Place the spoke between the two fixed posts and the moveable post of the TM-1. With aero/bladed spokes, position the posts so they rest against the wide, flat side of the spoke. Gently release handles.
- Note the reading on the scale of the TM-1.
Engage the TM-1 in the middle of the spoke
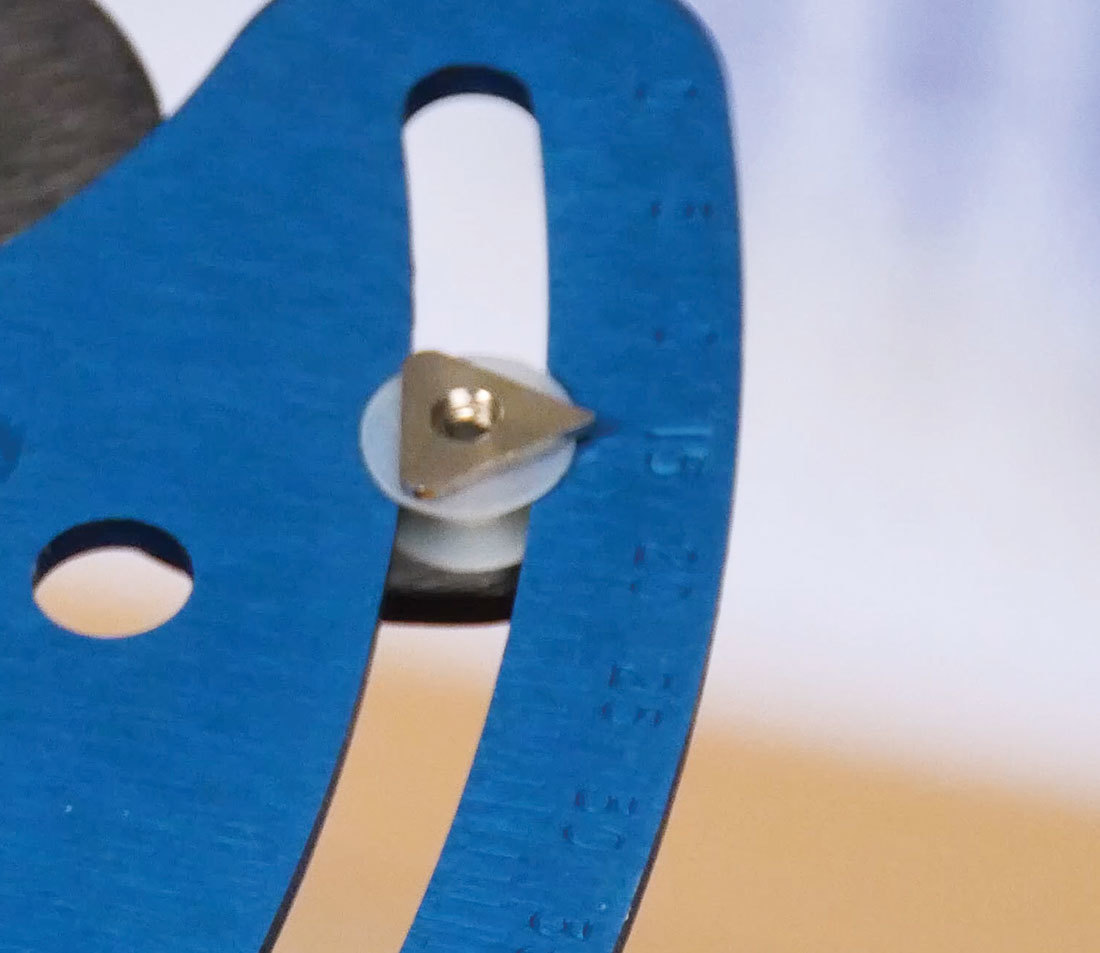
This TM-1 reading of 15 is cross-referenced with the TM-1 conversion table to determine kilograms-force
- Consult the conversion table included with the TM-1 or available on the Park Tool Wheel Tension App. Find the material and size that corresponds to your spoke, and find the measurement you got with the TM-1. This is the spoke’s tension measured in kilograms-force.
- Check one entire side of the wheel before making any tension adjustments. Write down your results and manually calculate the average, or input them into the Wheel Tension App.
- Repeat the process on the other side.
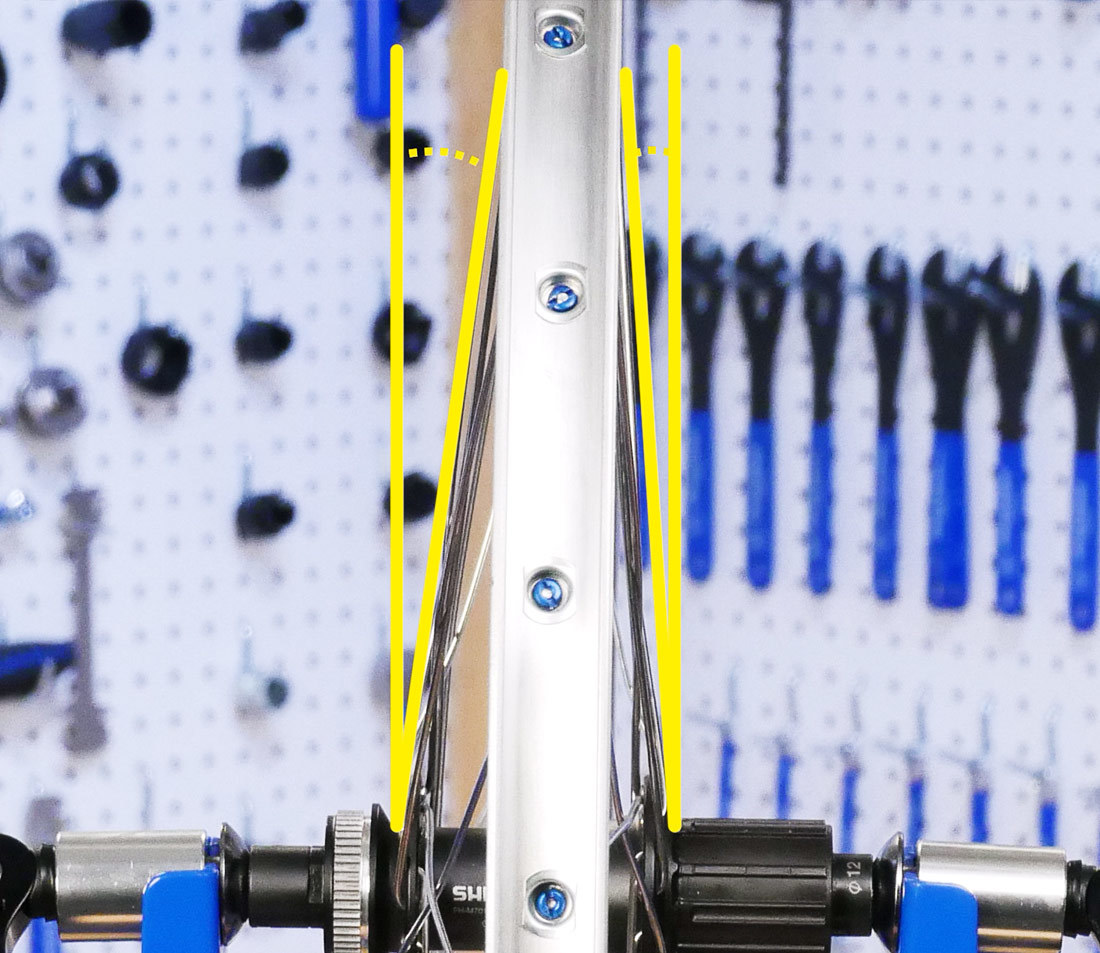
On rear wheels and wheels with disc brakes, notice that the readings are lower overall on one side. This is due to the fact that the spokes come out of the hub at different bracing angles. This is the angle at which a spoke leaves the hub and travels to the rim. When the spoke has a larger angle, it has more mechanical advantage and will require less tension to counter the opposing side. Your tension goal applies to the side with more tension. The opposing side will simply have lower tension when the centering, or dish, is correct.
Tension Adjustment
To adjust spoke tension it is helpful to have something to hold the wheel as you work, like a Park Tool truing stand or wheel holder. You’ll also need a properly sized spoke wrench to turn the spoke nipple - see Spoke Wrench Selection for more information.
When adjusting wheel tension, our number one goal is achieve consistent tension, or what we call good relative tension.
Correcting Low Tension
A wheel with low tension is adjusted by simply tightening the spokes. Begin your corrections at the valve hole to give yourself a reference point. If adjusting a wheel with different bracing angles, adjusting tension may change the dish of the wheel slightly. You can attempt to compensate for this by making a smaller adjustment on the side with a larger bracing angle. For example, on a rear wheel, give each spoke on the drive side ¼ turn, and those on the non-drive side ⅛ turn.
Once you’ve adjusted the entire wheel, re-measure the tension and record it. You will be able to see how much your work has adjusted the overall tension. If necessary, repeat the process, making small, even adjustments to the entire wheel and checking your work with the TM-1 until you have achieved proper tension.
Correcting High Tension
The process of reducing tension is very similar to increasing tension: you’ll just be turning the the spoke nipple the opposite direction. The same basic process applies: make small, even adjustments to the entire wheel and re-check using the TM-1.
Tension Balancing and Relative Spoke Tension
You may have noticed that as you take readings that there is some fluctuation between spokes on the same side.
If these vary widely, the wheel can benefit from tension balancing, where you tighten and loosen individual spokes to even out the tension of the wheel. A wheel with spokes that are within plus or minus 20% of the wheel’s average spoke tension is generally considered to have acceptable relative tension. This process is best done using the Park Tool Wheel Tension App and is covered in greater detail in the Park Tool Wheel Tension App Instructions.
TM-1 Calibration
The TM-1 Tension Meter is calibrated at the Park Tool manufacturing facility. Generally we do not recommend manual readjustment of tool. If the tool is worn or damaged and appears to be inaccurate, return to Park Tool for recalibration. Park Tool will recalibrate and return the tool for a reasonable charge.
It is recommended for professional mechanics and service departments use a non-riding wheel to help in tool calibration. Remove the axle from a wheel so that it is not rideable. Mark a spoke as a reference spoke and measure this one spoke. Write the date of the measurement directly on the rim. This same spoke can be used to double check the original calibration. If the tool is reading different than this “reference spoke,” the spring tension can be changed. If the tool is reading low, take the tool off the spoke and turn it upside down. Remove the spring from the fixed moving stud, and then thread the adjusting screw inward toward its stud. This will decrease tension on the TM-1 spring, resulting in a higher deflection reading. If the TM-1 is reading high, increase tension at the adjusting screw.
Special Thanks
The Park Tool Company would like to thank Colin S. Howat of the KTL Lab, Lawrence, Kansas, for his assistance and help in developing the TM-1 and the conversion table.
Next article in this series
Wheel Tension App Instructions View Article
Related articles
Wheel Truing (Lateral & Radial) View Article
Wheel Dishing (Centering) View Article